Replacing a blogger template without losing the widget data is slightly complicated for the beginners but still not a difficult job. For this we have to create a temporary space or trunk for your widgets (which are also called Page Elements) within your current template, place your widgets in that section, copying the code and pasting it in the new template, uploading the new template and finally we have to rearrange the widgets.
To start off, lets go to Blogger Dashboard and select the blog you want to edit. After doing that click Layout tab and select Edit Html.
Now for . Look for the following piece of code which is all the way at the bottom.
</body></html>
Now you’re going to replace this code with the following :
<b:section id='widgets-trunk' showaddelement='yes'/>
</body></html>
Save your template. If you have done it right then you have created a section at the bottom of the template.
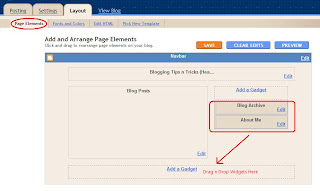
Now goto " Page Elements " and drag drop the widgets into your new section. This section basically creates a backup trunk for you widgets. See the picture for reference
After doing the above, save it. Congratulations, you have completed half of the task which was supposed to be the harder one. Now lets go to the " Edit Html " sub-tab again and find for this piece of code
<b:section id='widgets-trunk' showaddelement='yes'>
Now there should be some more code under this. For instance, in my case:
<b:section id='widgets-trunk' showaddelement='yes'>
<b:widget id='BlogArchive1' locked='false' title='Blog Archive' type='BlogArchive'/>

<b:widget id='Profile1' locked='false' title='About Me' type='Profile'/>

</b:section></body></html>
This is a list of all your widgets (Page Elements) that we just moved into the bottom section. You want to select all this code and copy it. We’re going to paste it into our new Blogger template code which will complete the transfer safely.
Now open your new Blogger template xml file in a text editor (you can use Notepad, just right click -> Open With -> Choose Notepad). Once you have it open, scroll all the way down to the bottom of the code and look for the following code:
</body></html>
You’re going to replace this code with the new code you just copied above. It is advised that you should not alter anything else unless you know what you are doing because otherwise you might mess things up. Save your new Blogger template and upload it through the field provided in the " Edit Html " sub-tab. Now goto the " Page Elements " sub-tab and Drag Drop the widgets where you like on the side bar. Save the template and Voila! you have successfully transferred your widgets without losing the data. Congratulations.
If you want any kind of help regarding this then please comments here. If you like the post then please vote on any Social Media Network.


I followed those steps exactly to the letter. My widgets were transferred but they were empty.:(
Thanks a lot for sharing this great tutorial now i will try to do that on my blog.